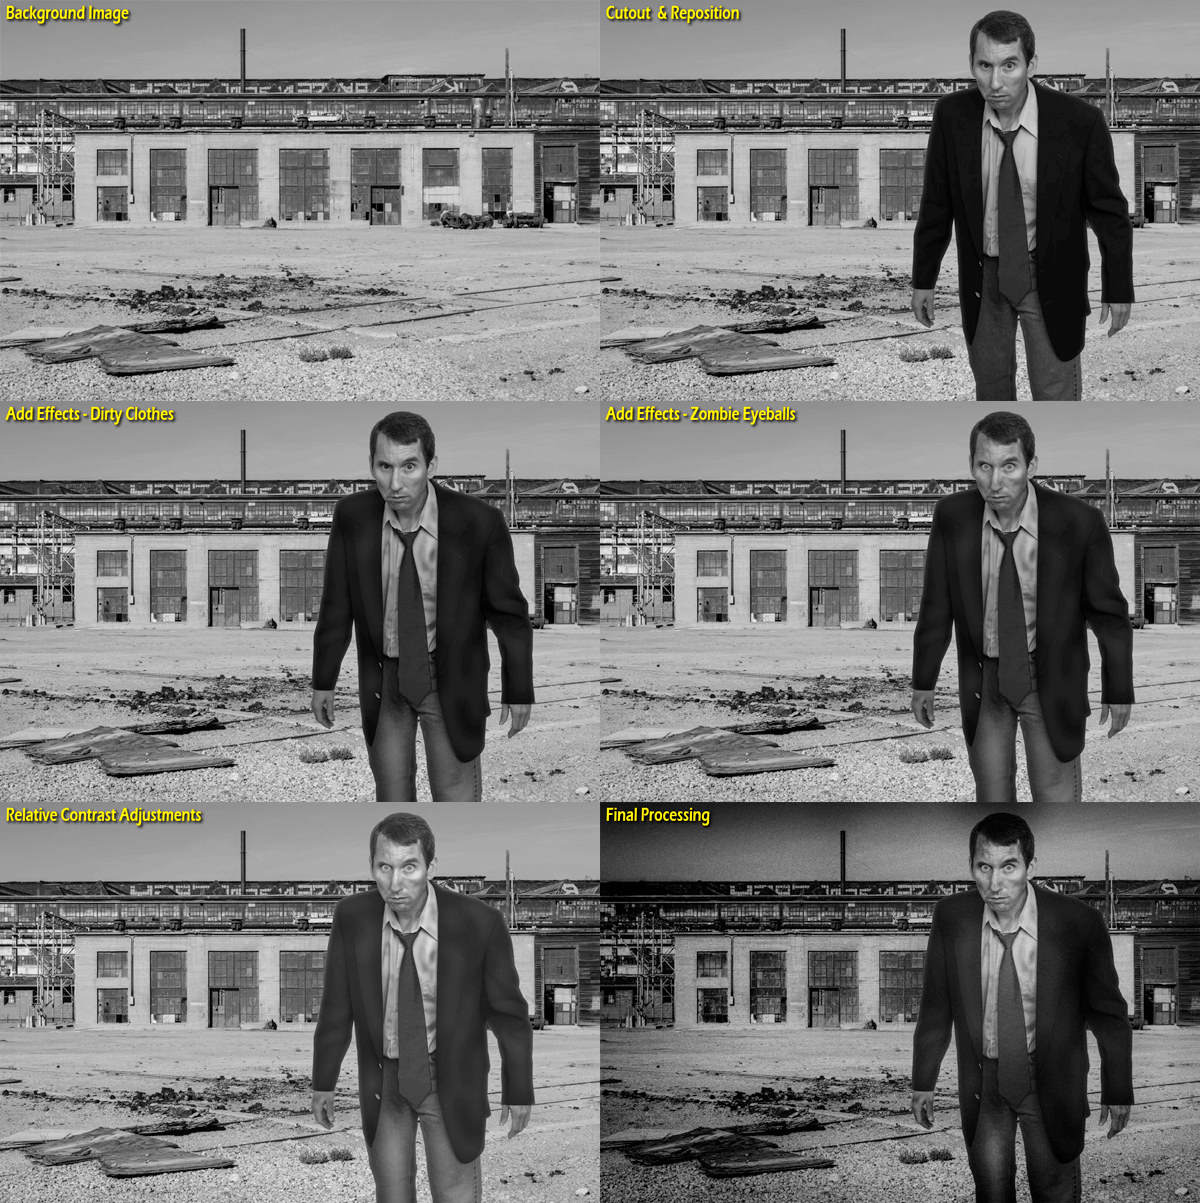
The following discussion details my creative process used for the Zombie Apocalypse photo published on this site. The photo was motivated by two separate assignments, each with a particular technical challenge to explore. (These assignments were handed out in the “Style It, Shoot It, and Share It” community on Google+; please read the photo narrative for background information.)
January Challenge – Theme for the month was “apocalypse” (since everyone had just survived the expiration of the Mayan calendar), and the technical component was to use a custom background or backdrop element. You could build something for a background, paint something for a background, or use a separate image and incorporate it into a composite image.
April Challenge – Theme for the month was a personal exploration of a riddle you had the freedom to complete. (“What’s black and white and ______ all over?”) You fill in the blank, and the image has to be your answer to the riddle. For a technical challenge, we were asked to deal with wardrobe details, picking out items that would “sell the shot”.
So how did I go about this? The riddle and answer came to me quickly. What’s black and white and DEAD all over? With the answer being The Zombie Apocalypse. I was intrigued by this idea because I associate zombie movies with old black-and-white films. And it naturally tied into the “apocalypse” theme. For the background technical component, I wanted to build a composite image with Photoshop (a zombie in one photo and the background from another). For the wardrobe component, I always think of zombies wearing suits for some reason. So a jacket and tie seemed relevant for a sixties-style zombie.
I found a few potential background images in my collection. The one I ultimately decided to use was taken last year at the Albuquerque Rail Yards. An older concrete building in disrepair seemed to have a good apocalyptic feeling. For the zombie, I decided to take a self portrait in my living room. (I really hope the neighbors didn’t notice me going through the various zombie poses and wonder what the heck I was doing.) The raw photos were converted to black and white, and my attention then turned to issues of compositing and processing.
As I have heard several times before, creating a convincing composite is easier when you take both images at the same angle, with the same lens, and in the same light. No such luck in this case. About all I could do was (A) add some edge lightness to the cutout in an attempt to simulate an overhead light source; and (B) try to match the contrast and brightness levels so one didn’t look radically different from the other. Adding noise and the final creative effects also helps disguise the mismatched issues somewhat.
I am very new to this process of making composites, and the above is certainly not provided as a general tutorial for doing this type of thing. Readers wanting to learn how to “do this for real” should search online or pick up some of the excellent published books on composites. For me, just documenting the process I used and learning something new. 🙂


Leave a Reply